Learn how to connect your Meta (Facebook) account to enable data exports with SyncRange.
Overview
Connecting your Meta account allows you to export valuable advertising data from Facebook, Instagram, and other Meta platforms to Google Sheets for analysis, reporting, and optimization. This integration enables you to track campaign performance, audience insights, and ad metrics automatically.
Prerequisites
Before connecting your Meta account, make sure you have:
Admin access to the Meta ad accounts you want to connect
For the recommended path: a Meta Business Manager (business portfolio) with those ad accounts added to it
When you connect Meta, SyncRange offers two options:
Option
Best for
Token lifetime
Connect with Business Manager (recommended)
Teams with ad accounts in Meta Business Manager
Does not expire every 60 days — best for scheduled exports
Continue with Facebook
Personal Facebook access when you do not use Business Manager
Expires about every 60 days; you must reconnect to keep exports running
Business Manager requirements
For Business Manager connect, your ad accounts must be in the business portfolio you authorize. During install you choose which ad accounts SyncRange can access. If an ad account is only on a personal Facebook profile and not in Business Manager, add it to Business Manager first, or use Facebook login instead.
Connecting Your Meta Account
Follow these steps to connect your Meta account:
Navigate to Apps
From your dashboard, go to the "Apps" section and select "Meta" or click the "Connect" button if you haven't connected any Meta accounts yet.
Choose how to connect
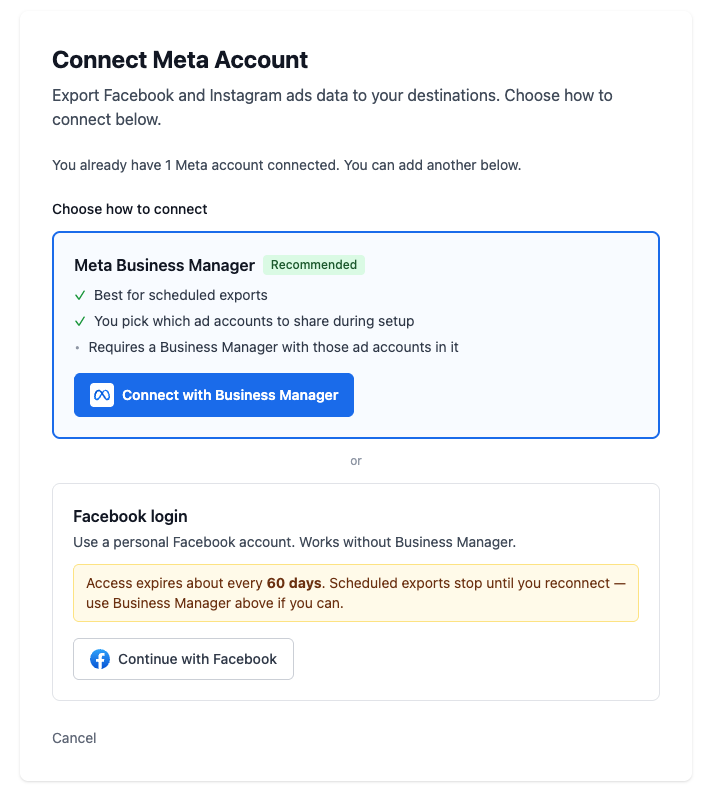
On the Meta connection page, choose Connect with Business Manager (recommended) or Continue with Facebook.
The Meta connection page
Authorize the Integration
You'll be redirected to Meta to authorize the connection. For Business Manager, sign in with a business portfolio and select the ad accounts to share. For Facebook login, authorize with your personal Facebook account.
Select Permissions
Review the requested permissions and select which ad accounts you want to connect. Click "Continue" to proceed.
Confirm Connection
After authorization, you'll be redirected back to our platform where you'll see a confirmation that your Meta account has been successfully connected.
Note
The connection process requires admin permissions for your Meta Business Manager or ad accounts. If you don't have admin access, you'll need to ask an administrator to complete this process.
Understanding Meta Permissions
When connecting your Meta account, you'll be asked to grant specific permissions. Here's what each permission allows us to do:
Permission
What it allows
Why it's needed
Read ad accounts
Access your ad account information
Required to list and select your ad accounts
Read campaign data
Access campaign information and metrics
Needed to export campaign performance data
Read ad insights
Access performance metrics for your ads
Required to export ad performance data
Read audience data
Access information about your custom audiences
Needed to export audience insights and metrics
Important
We only request read-only access to your Meta data. We cannot make changes to your ad accounts, campaigns, or ads.
Managing Your Meta Connection
Viewing Connection Details
After connecting your Meta account, you can view the connection details in the Meta Integration dashboard:
Account name and ID
Connection status
Connected ad accounts and their status
The Meta integration dashboard showing connection details
Adding more ad accounts
On a Business Manager connection, use Add more next to Ad Accounts on the Meta dashboard (or Reconnect Account). In Meta’s picker, select every ad account you want access to, including ones already connected, plus any new ones.
Disconnecting Your Account
To disconnect your Meta account from the integration:
Navigate to the Meta Integration dashboard
Click the "Disconnect" button
Confirm the disconnection when prompted
Warning
Disconnecting your Meta account will delete all connected Meta services and any configured exporters. This action cannot be undone.
Troubleshooting Connection Issues
Authorization Failures
If you encounter issues during the authorization process:
Verify you have admin access to your Meta Business Manager or ad accounts
Check if your Meta account has any restrictions or security settings that might block third-party connections
Try clearing your browser cache and cookies
Ensure you're not blocking cookies or pop-ups from Meta domains
Token Expiration
Personal Facebook login connections expire about every 60 days. Business Manager connections do not. If your connection is expiring or expired:
Use Reconnect on the Meta dashboard (exports and settings are kept)
Choose Connect with Business Manager when reconnecting to avoid repeating this every 60 days
If you stay on Facebook login, you will need to reconnect again when Meta expires access
Missing Ad Accounts
If some of your ad accounts aren't appearing:
Verify you have admin access to those specific ad accounts
Check if the ad accounts are active and in good standing with Meta
For Business Manager connect: ensure the ad accounts are in that business portfolio and were selected during authorization
Use Add more or Reconnect, and select both existing and new ad accounts in Meta’s picker
Next Steps
After successfully connecting your Meta account, you can:

 Install on Shopify